 Introduction
The BIOS (Basic Input/Output System) is the lowest level of
software in the PC. It is located on a separate chip on the motherboard
and is the first thing that is loaded when we turn the computer on.The BIOS starts by testing each component to make sure everything is operating as it should and that the computer has everything it needs to load the OS. This starting test is called the Power On Self Test, or POST. If any errors are detected during POST, the BIOS will report them either through a series of beeps or by displaying the error on the screen.
usually when we talk about the BIOS we are really talking about the BIOS setup, and the interface that is used to adjust these settings. The BIOS settings are like to core values of the PC and they are used to dictate how the computer will operate at a fundamental level.
To access the BIOS setup, you must press a particular key during the POST, usually this is the 'DELETE' key or the 'F2' key, depending on your motherboard.
As complicated as all this may sounds, in reality we don't have to do much in the BIOS setup, almost all of the default values are fine. There are a few we need to check and may need to be adjusted before we install our OS, but after that we will rarely or never need to come back to the BIOS (unless you intend to overclock that is).
Below are descriptions of which setting to check within each of the menus.
Explanations
Standard CMOS
 Inside the standard CMOS menu, you will find the time and date settings, so ensure that these are correct for your time zone. You will also see a list of connected IDE drives and an option to set your floppy disk drive.
Unless you are installing windows XP on a SATA drive then you probably
do not have any use for a floppy drive and can set this to 'none'.
The 'standard CMOS' is where you can set the Time/date and enable floppy disk drive.
Advanced BIOS
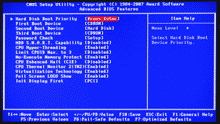
 The Advanced BIOS has options relating to the Boot order, CPU
features and POST screen
The boot priority is the order in which the BIOS looks at different
drives for an operating system to 'boot' from. Under normal conditions
the OS will be installed on the Hard drive, so this would be where the
BIOS should look for it, but we haven't installed in onto the hard drive
yet, so we need it to first check the CD/DVD drive so that it can boot
from the Windows disk and install it onto the hard drive:
The Advanced BIOS has options relating to the Boot order, CPU
features and POST screen
The boot priority is the order in which the BIOS looks at different
drives for an operating system to 'boot' from. Under normal conditions
the OS will be installed on the Hard drive, so this would be where the
BIOS should look for it, but we haven't installed in onto the hard drive
yet, so we need it to first check the CD/DVD drive so that it can boot
from the Windows disk and install it onto the hard drive:- Go into the Advanced BIOS menu.
- Locate the boot priority settings and set the first device to CDROM and the second to Hard Drive (HDD). The order of the following devices does not matter.
The 'Advanced BIOS' is where you can set the boot priority, telling the system where to look forst for the Operating System.
Integrated Peripherals
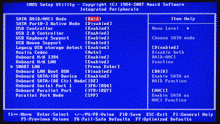
 Here you will need to check that the SATA controller is enabled to
allow you SATA drives to be recognised. Most likely this will be set to
enabled as default but its worth checking. If you can't find any options
that match this then down worry it just means it is automatic on your
motherboard.
 If you intend to run a RAID array then you may also need to check for options to enable RAID. Again you may not have this options in your BIOS so don't worry if you can't find it.
The 'Integrated Peripherals' is where you can set SATA and RAID controllers. However to set up a RAID array you must use the RAID utility.
PC Health
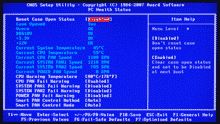
 The PC Health menu will provide you with readouts of temperatures,
voltages and fan speeds. You will be able to set temperature warning
thresholds and warnings to indicate if a fan stops working.
The PC Health menu will provide you with readouts of temperatures,
voltages and fan speeds. You will be able to set temperature warning
thresholds and warnings to indicate if a fan stops working.Some motherboards will also have settings for adjusting fan speeds depending on certain temperatures inorder to make the PC quieter when not running at full speed.
The 'Integrated Peripherals' is where you can set SATA and RAID controllers. However to set up a RAID array you must use the RAID utility.
Setting up RAID
In order to use a RAID array you must first create it in the RAID utility. This is separate to the BIOS and the screen that prompts you to open this utility will usually follow the POST or motherboard logo screen after you have switched on your computer.
You will be prompted to pres a key combination (for example ctrl + i) in order to enter the setup utility. On entering it will list any existing arrays and will give you a small number of options, usually 'Create RAID volume', 'Delete RAID Volume' and 'Exit'. It should be pretty self explanatory what these options are. Once you go to create RAID volume you will be given the options to add disks to the array and the type of array you would like (eg. stripe (0), mirror (1), Stripe with parity (5) etc.).
Once set up the array will be usable as a single unit so that you can install the OS onto it or just use it for data storage.


